Introduction
Artificial flower trees are remarkably durable — but only if assembled, shaped, and maintained correctly. A poorly assembled tree looks sparse, lopsided, and cheap. A properly assembled tree looks lush, natural, and realistic — the difference between a $50 rental and a $150 rental. This guide covers everything: unboxing, step-by-step assembly, branch shaping techniques (the secret to a full, natural look), placement rules, cleaning, common repairs, and storage best practices. Whether you're a rental business owner prepping inventory, an event planner setting up for a wedding, or a homeowner decorating for a party, these techniques ensure your flower trees look their absolute best for 50+ uses.
Xibo Floral Flower Trees: Built for 50+ Rentals
Reinforced steel frames, wired+glued flower attachment, UV-stabilized colors. 15+ styles, 4-10 ft sizes. MOQ 1 piece, free samples. Includes detailed assembly guide with every order.
Request Wholesale Catalog & Free SamplesUnboxing & Parts Identification
Every Xibo Floral flower tree ships with the following components. Before assembly, lay out all parts and verify nothing is missing or damaged.
| Component | Description | Quantity (typical) |
|---|---|---|
| Main trunk | Central vertical pole, 4-8 ft tall, with branch attachment points | 1 |
| Base plate | Heavy metal base (10-20 lbs), 12-18 inch diameter, with trunk socket | 1 |
| Branch sections | Pre-flowered branches with quick-connect ferrules, color-coded by level | 6-12 branches |
| Top crown | Final top section with flowers, attaches to trunk apex | 1 |
| Allen wrench / tool | For tightening base set screw (some models) | 1 |
| Instruction sheet | Diagram showing branch placement by color code | 1 |
Inspection checklist upon delivery:
- Check box for visible damage (crushed corners, tears). If box is damaged, photograph before opening — evidence for shipping claims.
- Verify all components present against instruction sheet. Missing parts? Contact factory within 48 hours.
- Inspect each branch: flowers should be firmly attached (tug gently — none should come off), no bent ferrules, no crushed petals.
- Check trunk: straight (no bends), all branch sockets intact, no rust or paint chipping.
- Check base: flat (no warping), socket aligned, set screw functional.
- Document any damage with photos. Contact Xibo Floral within 48 hours for replacements — most issues resolved with free replacement parts shipped within 3-5 days.
Step-by-Step Assembly
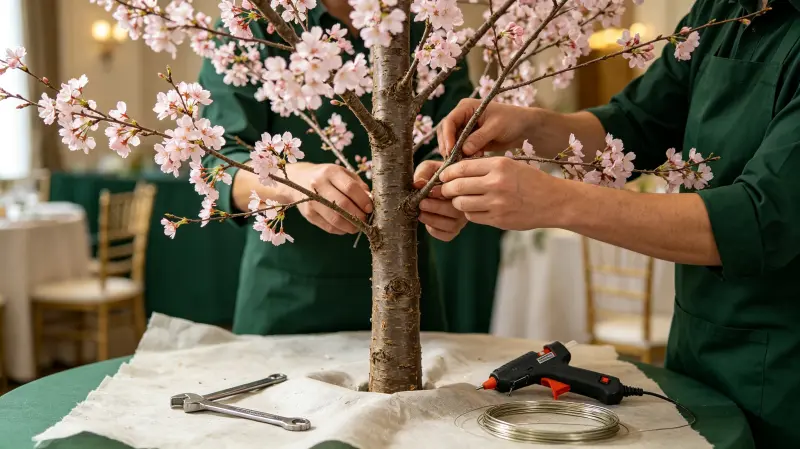
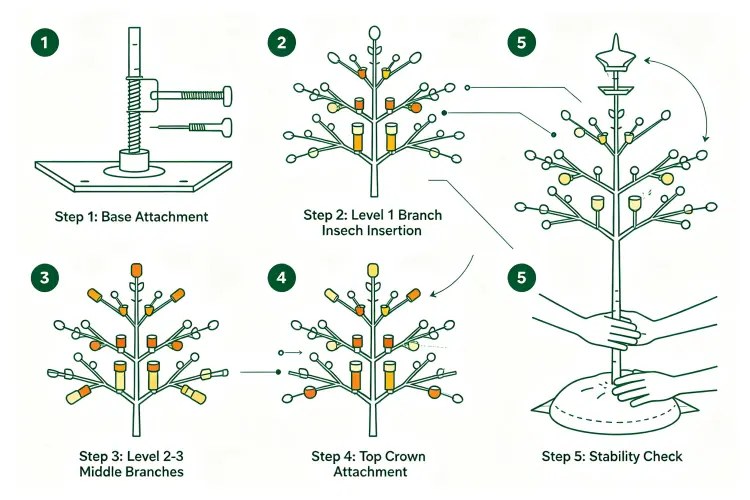
- Prepare your workspace: Clear a flat area 6x6 ft. Lay down a blanket or sheet to protect flowers from scratching on the floor. Ensure good lighting — you need to see branch color codes clearly.
- Attach base to trunk: Insert trunk into base socket. Align the set screw hole. Tighten set screw with Allen wrench (clockwise) until trunk is secure. Tug trunk gently — should not wobble. If wobbling, tighten further or check that trunk is fully seated in socket.
- Stand the tree upright: With base on floor, lift tree to vertical position. The base should sit flat — if it rocks, the floor may be uneven (use a small shim under the base) or the trunk may be slightly bent (gently straighten).
- Identify branch levels: Branches are color-coded or numbered by level (Level 1 = lowest branches, Level 4 = highest). Consult instruction sheet for your specific tree model. Lower branches are longer and more horizontal; upper branches are shorter and more upward-angled.
- Insert Level 1 branches (lowest): Start with the lowest branch sockets. Insert each branch ferrule into its matching socket. Twist gently clockwise 1/4 turn to lock. Pull gently to confirm it's seated. Work around the tree evenly — don't insert all branches on one side first (tree becomes unbalanced and may tip).
- Insert Level 2-3 branches (middle): Move upward, inserting each level. Alternate sides to maintain balance. Each branch should point slightly outward and upward — if a branch points downward, the ferrule may be inserted at wrong angle (remove and reinsert).
- Attach top crown: Insert the top crown piece onto the trunk apex. Twist to lock. The crown should sit straight — if tilted, adjust until vertical.
- Stability check: Place both hands on the trunk at mid-height. Gently shake side to side. Tree should sway slightly but base should remain firmly on floor. If base lifts or tree tips easily, check that all branches are evenly distributed and base is on flat ground. For outdoor use or tall trees (8 ft+), add a sandbag on the base for extra stability.
- Final visual check: Step back 6-8 feet. Look at the tree from all 4 sides. Check for: bare spots (missing flowers visible), lopsided shape (one side fuller), gaps between branches, and overall symmetry. Note any areas needing shaping (next section).
Assembly time: 5-10 minutes per tree for experienced assemblers, 15-20 minutes for first-timers. The first tree always takes longest — after assembling 2-3, you'll be fast. Pro tip: For rental businesses, pre-assemble all trees before the event day. Do a "dry run" assembly at home/warehouse so you know exactly how long it takes and can identify any issues before arriving at the venue.
Branch Shaping & Fluffing Techniques
This is the most important step — and the one most people skip. Shaping transforms a "flat, sparse, artificial-looking tree" into a "lush, full, natural-looking tree." Spend 5-10 minutes shaping per tree. It's the difference between a $50 rental and a $150 rental.
Branch Shaping Method
- Start from the bottom: Work on Level 1 branches first. Each main branch has 3-5 sub-branches (smaller stems with flowers). Gently bend each sub-branch outward and slightly upward. Use both hands — one at the base of the sub-branch, one at the tip — to create a gentle arc. Don't bend at a sharp angle (looks unnatural).
- Create depth: Not all sub-branches should be at the same angle. Bend some forward (toward viewer), some backward (away), some to the sides. This creates 3D depth — the tree looks full from all angles, not just the front. A common mistake is bending all branches flat in one plane (looks like a 2D cutout).
- Vary the height: Within each branch level, some sub-branches should be higher, some lower. This creates an organic, irregular silhouette — real trees don't have perfectly level branches. Aim for 2-4 inches of height variation within each level.
- Fill gaps: Look for bare spots where the trunk or inner branches are visible. Bend nearby branches toward the gap to cover it. If a gap persists after shaping, you may have a branch in the wrong socket (check instruction sheet) or a missing flower cluster (contact factory for replacement).
- Flower positioning: Each flower cluster should face outward (not inward toward trunk or downward toward ground). Gently rotate flower clusters so blooms face the viewer. For cherry blossom and wisteria trees, cascading flowers should hang naturally — don't bend them upward.
- Top crown shaping: The top crown sets the tree's silhouette. Shape crown branches to create a rounded or pointed top (depending on tree style). Cherry blossom = rounded full top. Olive = irregular, airy top. Wisteria = cascading, drooping top.
- Step back and assess: After shaping all branches, step back 8-10 feet. Walk around the tree. Check all 4 sides. Look for: symmetry (not perfectly symmetrical — natural trees are slightly irregular), fullness (no visible trunk except at base), natural silhouette (no "flat" or "lopsided" areas). Touch up any problem spots.
Common Shaping Mistakes to Avoid
- Over-bending: Bending branches at sharp 90-degree angles looks artificial. Use gentle curves (15-30 degrees from natural position).
- All branches same direction: If every branch points straight out, the tree looks like a umbrella. Vary angles — some up, some out, some slightly down.
- Ignoring the back: Many people shape only the front (facing them). Always shape all sides — guests will walk around the tree, and photographers shoot from all angles.
- Crushing flowers: Handle branches by the stem/wire, not by the flowers. Squeezing flower heads crushes petals and leaves permanent marks.
- Skipping the top: The crown is the most visible part — spend extra time shaping it. A poorly shaped top ruins the entire tree's appearance.
Want a Pre-Shaped, Ready-to-Use Tree?
Xibo Floral offers "Premium Pre-Shaped" trees — each tree is hand-shaped by our artisans before shipping. Arrives ready to display, no shaping needed. +$15-30 per tree. Saves 10 minutes per setup. Ideal for high-volume rental businesses.
Ask About Pre-Shaped TreesPlacement & Positioning Guide
Where to Place Flower Trees
| Location | Best Tree Size | Placement Tips |
|---|---|---|
| Ceremony altar (flanking) | 6-7 ft | Place 2 trees symmetrically, 3-5 ft apart, framing the altar/couple. Ensure both trees are same height and style. |
| Entrance / welcome area | 7-8 ft | Place 1-2 trees near entrance sign or welcome table. Creates immediate "wow" impression. Leave 3 ft clearance for foot traffic. |
| Aisle marker (every other row) | 4-5 ft | Place at end of every 2nd-3rd aisle row. Don't block walkways. Use smaller trees so guests can see over them. |
| Head table backdrop | 6-8 ft | Place 2-4 trees behind head table, spaced evenly. Combine with flower wall for luxury look. Ensure trees don't block guests' view of couple. |
| Photo booth / selfie station | 5-7 ft | Place 1-2 trees as backdrop or framing elements. Position so tree fills background without blocking subjects. Good lighting essential. |
| Corner accent (reception) | 6-8 ft | Fill empty corners with a statement tree. Adds vertical interest without taking floor space. Angle tree slightly toward room center. |
| Tabletop centerpiece | 2-4 ft (mini) | Use mini trees as table centerpieces. Place on round tables (1 per table) or long tables (every 4-6 ft). Ensure tree doesn't block conversation (under 3 ft ideal). |
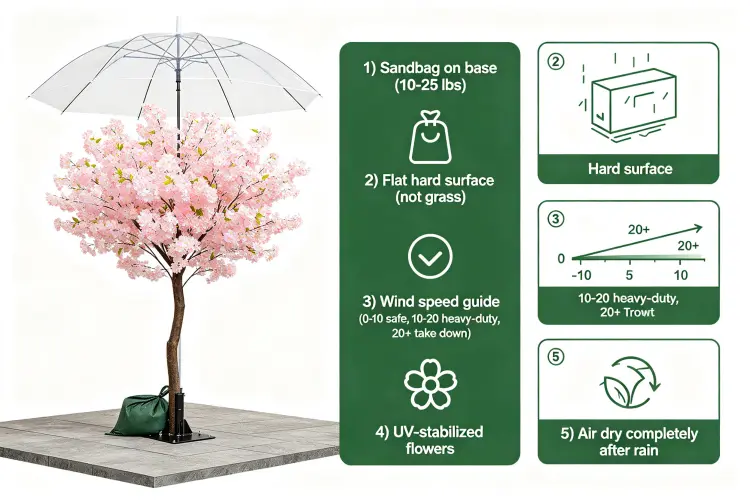
| Outdoor garden / patio | 6-10 ft | Use sandbag on base for wind stability. Place on flat, hard surface (not grass — base may sink). Avoid direct harsh sunlight if possible (UV-stabilized trees handle it, but colors last longer in shade). |
Placement Rules
- Ceiling clearance: Tree height + 1 ft minimum clearance. 7 ft tree needs 8 ft ceiling. For venues with low ceilings (under 8 ft), use 4-6 ft trees or custom shorter trees.
- Floor space: Tree canopy extends 2-4 ft wide. Ensure at least 1 ft clearance from walls, furniture, and walkways. Don't place trees where guests will brush against them repeatedly (loosens flowers over time).
- Traffic flow: Never place trees in primary walkways, doorways, or emergency exits. Keep 3 ft clearance for wheelchair access (ADA compliance for public events).
- Lighting: Place trees where they'll be well-lit — near windows, under spotlights, or with uplighting. A beautiful tree in a dark corner is wasted. Consider adding a small uplight ($15-30 LED spotlight) at the base for dramatic effect.
- Surface: Place on flat, hard surfaces (wood, tile, concrete, carpet over hard floor). Avoid soft grass, uneven ground, or thick shag carpet (base may tip). If on grass, use a flat board or paver under the base.
- Symmetry vs. asymmetry: For formal events (weddings, galas), use symmetric pairs/groups. For boho/organic events, use asymmetric grouping (3 trees of varying heights in a triangle cluster).
Cleaning & Long-Term Maintenance
Regular Cleaning (Every 5-10 Rentals or Monthly)
- Dust removal: Use a feather duster or soft microfiber cloth to gently wipe leaves and flowers. Start from top and work down. For heavy dust buildup, use a hair dryer on COOL setting (never hot — heat melts glue and damages silk) to blow dust off.
- Spot cleaning: For stains (food, drink, makeup), use a damp cloth with mild soap (dish soap diluted 1:10 with water). Gently dab — don't rub (rubbing damages silk petals). Rinse with clean damp cloth. Air dry completely before storage.
- Disinfection (for rental businesses): Lightly spray with a fabric-safe disinfectant (Lysol fabric spray or 70% isopropyl alcohol in spray bottle). Test on an inconspicuous area first — some sprays can discolor certain flower colors. Allow to dry fully before packing.
- Flower tightness check: Gently tug 5-10 random flowers per tree. Any that feel loose should be re-glued with hot glue (low-temperature glue gun) or floral wire. Don't wait for flowers to fall off during an event — preventive maintenance saves embarrassment.
- Branch stability check: Wiggle each branch gently at the ferrule connection. If any branch is loose, remove and reinsert with a 1/4 twist. If ferrule is worn/bent, contact factory for replacement branch.
Seasonal Deep Clean (2-3 Times Per Year)
- Disassemble tree completely (remove all branches from trunk).
- Fill a large tub or bathtub with lukewarm water + mild detergent (1 tbsp per gallon).
- Submerge branches (not the trunk/ferrule — metal parts can rust) and gently swish for 30 seconds.
- Rinse with clean water.
- Lay branches flat on towels, flower-side up, to air dry completely (4-8 hours). Do NOT use hair dryer or heater — air dry only.
- Once fully dry, reshape branches (they may flatten slightly from washing) and reassemble.
Maintenance schedule for rental businesses: Quick dust + flower check after every rental (2 minutes). Full cleaning every 5-10 rentals (10 minutes). Deep clean + reshape every 20-30 rentals or at start/end of peak season (30 minutes). With this schedule, Xibo Floral trees last 50-100+ rentals. Trees that are never cleaned or maintained last 20-30 rentals before looking tired.
Common Repairs & Troubleshooting
| Issue | Cause | Fix | Time |
|---|---|---|---|
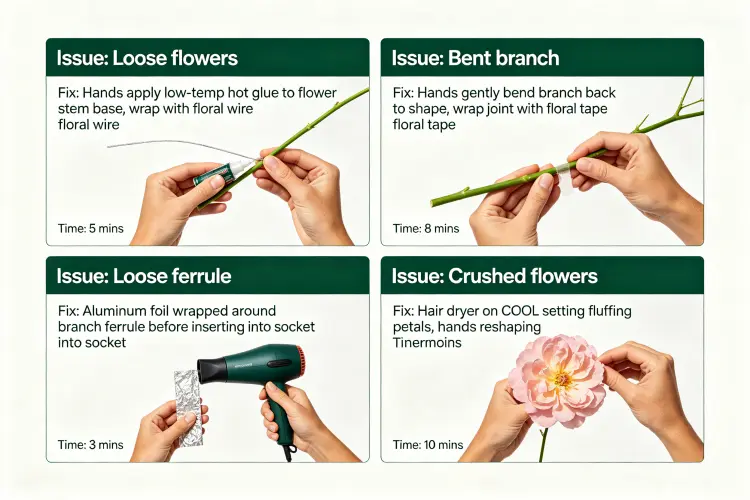
| Loose / falling flowers | Glue degraded from age/heat, or branch bent sharply | Re-attach with low-temp hot glue + wrap stem with floral wire for extra security | 2 min per flower |
| Bent branch (won't hold shape) | Metal wire fatigued from repeated bending | Gently bend back to desired shape. If won't hold, wrap joint with floral tape or replace branch | 1-3 min |
| Tree wobbles / tips easily | Uneven floor, base not flat, branches unbalanced | Check floor level, add shim under base, redistribute branches evenly, add sandbag | 5 min |
| Branch won't stay in socket | Worn ferrule, socket stretched, or cross-threaded | Wrap ferrule with small piece of aluminum foil before inserting (tightens fit), or replace branch | 2 min |
| Crushed / flattened flowers | Poor storage, heavy items stacked on tree | Use hair dryer on COOL to fluff petals, gently reshape by hand. Severe crushing = replace flower cluster | 3-5 min |
| Faded color (sun exposure) | Prolonged direct sunlight (non-UV flowers) | Cannot reverse fading. Prevent by using UV-stabilized trees (Xibo Floral standard) and limiting direct sun | N/A (prevention) |
| Rust on base / trunk | Moisture exposure (outdoor use, storage in damp area) | Lightly sand rust spots, touch up with matching spray paint (matte black/brown). Prevent by keeping dry | 10 min + dry time |
| Missing flower cluster | Broke off during transport/setup | Order replacement cluster from factory ($3-8). Hot glue + wire in place. Keep spares in inventory kit | 5 min (with spare) |
Repair kit essentials (keep with inventory): Low-temp hot glue gun + glue sticks, floral wire (22 gauge), floral tape, wire cutters, small scissors, aluminum foil (for loose ferrules), matching spray paint (for base touch-ups), replacement flower clusters (2-3 per tree style, ordered from factory). Total kit cost: $30-50. Saves you from emergency trips to craft stores mid-event.
Disassembly & Storage
Disassembly (After Event)
- Inspect before disassembly: Check for any damage that occurred during the event (loose flowers, bent branches). Note damage for repair before next rental.
- Remove top crown: Twist counterclockwise 1/4 turn and lift off. Place gently on protective surface.
- Remove branches top-down: Start with highest branches, work downward. Twist each branch counterclockwise 1/4 turn and pull straight out. Don't yank at an angle (can bend ferrule). Place branches in storage bin as you go.
- Remove trunk from base: Loosen set screw, lift trunk out of base socket.
- Quick clean: Dust each branch with feather duster before packing. Spot-clean any visible stains.
- Pack carefully: Nest branches inside each other (they fit like puzzle pieces). Don't force or crush. Place heavier trunk/base at bottom of bin, branches on top with protective layer between.
Storage Best Practices
- Temperature: Store in cool, dry area (50-80°F / 10-27°C). Avoid attics (extreme heat melts glue) and garages without climate control in summer (can reach 120°F+).
- Humidity: Keep below 60% humidity. High humidity causes mold on silk flowers and rust on metal frames. Use desiccant packs in storage bins if in humid climate.
- Light: Store away from direct sunlight — even UV-stabilized flowers fade with prolonged sun exposure. Dark closet or covered bin is ideal.
- Pests: Check periodically for insects (silk flowers can attract certain bugs in warm climates). Use cedar blocks or lavender sachets in storage bins as natural deterrent.
- Stacking: Don't stack heavy items on top of tree storage bins. Bins can be stacked 2-3 high if they're rigid plastic, but put heavier bins (with bases/trunks) on bottom, lighter bins (branches only) on top.
- Labeling: Label each bin with tree style, size, and "this side up." For rental businesses with 10+ trees, create an inventory spreadsheet tracking: tree ID, style, size, purchase date, rental count, last maintenance date, condition notes.
Storage options by inventory size: 1-5 trees: stackable plastic bins in closet or corner of garage ($20-40 per bin). 6-20 trees: dedicated shelving unit in garage or storage room ($100-300 for heavy-duty shelves). 20+ trees: climate-controlled storage unit ($50-150/month) or warehouse space. Never store trees assembled long-term — branches stay bent in one position and develop "memory," flowers collect dust, and the tree takes 5x more space. Always disassemble after each use.
FAQ
First time: 15-20 minutes (including reading instructions and shaping). After 2-3 trees: 5-10 minutes total (3 min assembly + 5 min shaping). For rental businesses setting up multiple trees at an event, budget 10 minutes per tree to be safe. A 4-tree ceremony setup = 40 minutes including placement and final touch-ups. Time-saving tip: Pre-assemble and pre-shape trees at your warehouse before the event. At the venue, you only need to transport (already assembled) and position — 2-3 minutes per tree. This cuts event setup time by 70%. The trade-off: assembled trees take more space in transport (need van/SUV), vs. disassembled trees fit in a car.
For home/permanent decor: Yes, you can leave it assembled indefinitely. Just dust monthly and keep away from direct sunlight and heat sources. For rental businesses: No — always disassemble after each event. Reasons: (1) Assembled trees take 5x more storage space. (2) Branches develop "memory" from being in one position — after 1+ weeks assembled, they resist reshaping and look stiff. (3) Dust accumulates faster on assembled trees. (4) Transporting assembled trees risks branch damage (they catch on doorframes, car interiors). (5) Disassembling allows you to inspect and repair each branch. Exception: If you have a tree on display in your showroom/office as a sample, leave it assembled — it's marketing, not inventory.
Several techniques: (1) Proper shaping — most "sparse" trees are just unshaped. Bend all sub-branches outward with varied angles to create fullness. This alone fixes 80% of sparse-looking trees. (2) Add extra flower clusters — purchase additional flower picks ($1-3 each) from the factory or craft store, and insert them into bare spots using floral wire. 5-10 extra picks per tree can significantly increase fullness. (3) Layer with greenery — add artificial eucalyptus or ivy sprigs ($2-5 each) tucked between flower branches. Adds volume and natural texture. (4) Pair trees — two trees placed close together (1-2 ft apart) create a fuller combined look than one tree alone. (5) Position strategically — place tree in a corner where two walls meet; the walls reflect and frame the tree, making it appear larger. Best long-term solution: Order "deluxe/full" version trees from Xibo Floral (30-40% more flowers, +$15-30 per tree) — designed to look full even without extensive shaping.
Light rain / drizzle: Yes, Xibo Floral trees are water-resistant. Silk flowers and powder-coated steel frames handle brief rain exposure. After rain, let tree air dry completely before disassembly/storage (to prevent mold/rust). Heavy rain / thunderstorms: Not recommended. Prolonged water exposure can: (1) Soften glue holding flowers (flowers may detach). (2) Cause silk petals to become limp and lose shape. (3) Promote mold growth on flowers if stored damp. (4) Cause rust on unprotected metal parts (base, ferrules). Outdoor best practices: Check weather forecast — if >50% chance of heavy rain, have a backup indoor location or cancel tree installation. Use a clear plastic umbrella or tent over trees if brief showers expected. After any outdoor use, inspect for water damage and dry thoroughly. UV-stabilized flowers (Xibo Floral standard) resist sun fading for 200+ hours of direct sun — enough for a full outdoor wedding season.
With proper assembly, shaping, cleaning, and storage: 50-100+ rentals per tree. Xibo Floral commercial-grade trees are designed for this lifespan. Factors that reduce lifespan: (1) Poor handling (yanking branches, crushing flowers during transport) = 20-30 rentals. (2) No cleaning (dust buildup, stains) = 30-40 rentals before looking tired. (3) Outdoor use in harsh conditions (direct sun, rain, wind) = 25-40 rentals. (4) No repairs (loose flowers left to fall off) = 20-30 rentals. Signs a tree needs replacement: 20%+ flowers missing or damaged, branches that won't hold shape, visible rust on frame, color fading noticeable in photos, client complaints about appearance. Cost per rental: $85 tree / 75 average rentals = $1.13 per rental. Compare to $75 rental fee = 98.5% profit margin on tree cost. This is why flower trees are one of the best rental inventory investments.
No special tools required for basic assembly (trees use tool-free quick-connect ferrules). For full maintenance and repair kit, recommended items: (1) Low-temperature hot glue gun + glue sticks ($10-15) — for re-attaching flowers. (2) Floral wire, 22 gauge ($3-5) — for securing flowers and shaping. (3) Floral tape ($2-3) — for covering wire, reinforcing joints. (4) Wire cutters / small pliers ($5-10) — for cutting wire, bending branches. (5) Feather duster or microfiber cloths ($5-10) — for cleaning. (6) Hair dryer (use COOL setting only) — for fluffing crushed flowers, blowing dust. (7) Replacement flower clusters ($3-8 each, order from factory) — keep 2-3 spares per tree style. (8) Matching spray paint ($5-10) — for base touch-ups. Total kit: $30-60. This kit handles 95% of all maintenance and repair needs. Keep it with your inventory — never set up for an event without it.
Source Commercial-Grade Flower Trees from Xibo Floral
15+ styles (cherry blossom, wisteria, rose, olive, magnolia, maple, birch, orchid, tropical), 4-10 ft sizes. Reinforced steel frames, wired+glued flowers, UV-stabilized colors. $45-180 wholesale, MOQ 1, free samples, 50+ rental lifespan. Every tree includes detailed assembly guide. 500+ rental business clients worldwide.
Request Wholesale Catalog & Free Samples