Introduction
Floral hoops are incredibly versatile — but only if you know how to hang them properly. A poorly hung hoop can fall, damage walls, or look crooked in photos. This guide covers everything you need: 5 hanging methods for every surface type, exact height and spacing calculations, 6 proven layout designs, safety weight limits, outdoor wind security, and damage-free teardown. Whether you're a rental business setting up for a wedding, a planner installing at a venue, or a DIY bride decorating your own event, these techniques ensure professional, secure, photo-perfect results every time.
Wholesale Floral Hoops from $8-45
Xibo Floral manufactures premium floral hoops in 6 sizes, 20+ colors. MOQ 1 piece, 7-15 day production, commercial-grade (50+ reuse). Free samples available.
Request Wholesale CatalogTools & Hardware Checklist
| Tool/Hardware | Purpose | Est. Cost | Essential? |
|---|---|---|---|
| Clear fishing line (20-50 lb test) | Invisible hanging from ceilings, pipes, beams | $3-8 | Yes |
| Command hooks (various sizes) | Damage-free wall hanging (drywall, paint, tile) | $5-15/pack | Yes |
| 3M Command strips (large, 16 lb) | Flat-back hoop mounting on walls | $8-12/pack | Yes |
| Cup hooks / eye screws (1-2 inch) | Permanent wood/beam mounting (venue allows holes) | $3-6/pack | Optional |
| Zip ties (black/white, 8 inch) | Secure hoops to pipes, arches, trusses | $3-5/pack | Yes |
| Ladder (6-8 ft step ladder) | Reach ceiling/wall mounting points | $50-100 (or borrow) | Yes |
| Laser level | Ensure hoops are perfectly straight/level | $15-30 | Recommended |
| Tape measure (25 ft) | Measure spacing, height, distances | $8-15 | Yes |
| Scissors / wire cutters | Cut fishing line, zip ties, flower stems | $5-10 | Yes |
| Painter's tape (low-adhesive) | Mark positions on walls without damage | $3-6 | Recommended |
| Sandbags (for freestanding) | Weight down freestanding hoop stands | $10-20 each | For floor displays |
Pro kit recommendation: Assemble a "hoop installation kit" in a small toolbox with all the above items. Keep it with your rental inventory. Total kit cost: ~$80-120. This kit saves you from last-minute runs to the hardware store mid-setup — the #1 cause of delayed event setups.
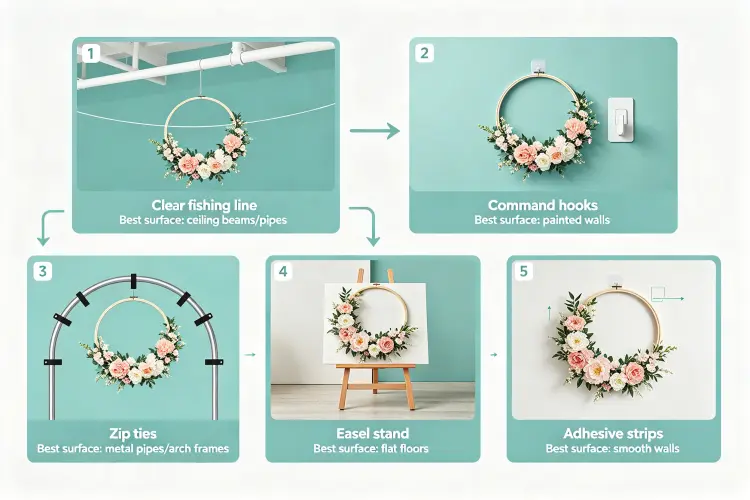
5 Hanging Methods for Any Surface
Method 1: Clear Fishing Line (Best for Ceilings & Beams)
- Cut fishing line to desired length (hoop hanging distance from ceiling + 12 inches extra for knots).
- Tie one end securely around the ceiling anchor point (pipe, beam, hook, truss). Use a bowline knot or double overhand — doesn't slip under weight.
- Tie the other end to the hoop's metal frame at the top center (12 o'clock position). For large hoops (24 inch+), use two attachment points (11 o'clock and 1 o'clock) for stability.
- Adjust length by tying knots higher or lower on the line. Test by pulling gently — hoop should hang level and not spin.
- For multiple hoops at different heights (cloud installation), vary line lengths by 6-18 inches between hoops.
Best for: Ceiling installations, hanging over dance floors, industrial venues with exposed beams, pipe-and-drape frames. Weight limit: 20-50 lbs depending on line test — floral hoops weigh 0.3-1.5 lbs each, so this is overkill. Pro tip: Use 50 lb test line for all installations — costs the same as 20 lb but gives 2.5x safety margin.
Method 2: Command Hooks (Best for Damage-Free Wall Hanging)
- Clean wall surface with rubbing alcohol — Command hooks fail on dusty/greasy walls.
- Peel backing from adhesive strip, press hook firmly to wall for 30 seconds.
- Wait 1 hour before hanging weight (critical — adhesive needs to cure). For event setups with limited time, use the "instant hold" Command strips (rated for immediate use).
- Hang hoop directly on the hook (small hoops) or tie fishing line from hook to hoop (for adjustable height).
- Weight capacity: small hook = 1 lb, medium = 3 lb, large = 5 lb, jumbo = 7.5 lb. A 36-inch floral hoop weighs ~1.5 lbs — use medium or large hook.
Best for: Drywall, painted walls, tile, wallpaper (test small area first). Most wedding venues require damage-free hanging — Command hooks are the standard. Pro tip: Always bring extra Command hooks. They occasionally fail if wall wasn't clean enough or humidity is high. Have a backup plan (painter's tape loop) for emergencies.
Method 3: Zip Ties (Best for Pipes, Arches & Trusses)
- Position hoop against the pipe/arch/truss at desired location.
- Thread zip tie through the hoop frame and around the pipe. Pull tight but not so tight that it distorts the hoop shape.
- Use 2 zip ties per hoop (top and side) for stability — one zip tie allows spinning.
- Cut excess zip tie tail with wire cutters for clean appearance.
- For removable/reusable installation, use reusable Velcro cable ties instead of one-time zip ties.
Best for: Securing hoops to flower arch frames, metal arches, pipe-and-drape vertical poles, event trussing, stair railings. Pro tip: Use black zip ties on dark frames, white on light frames — they disappear visually. Never use clear zip ties (they're weaker and yellow over time).
Method 4: Freestanding on Easel or Stand (Best for Floor Displays)
- Use a standard art easel (adjustable 3-6 ft height) or a dedicated hoop stand (metal circular stand).
- Place easel at desired location. Secure base with sandbags if in high-traffic area or outdoor (prevents tipping).
- Rest hoop on the easel's ledge. For large hoops (24 inch+), lean against the easel back support.
- Secure with a small piece of fishing line or Velcro between hoop and easel (prevents sliding off if bumped).
- For tabletop hoops (8-12 inch), use a small plate stand or picture easel ($5-10).
Best for: Ceremony altars, entrance displays, sweetheart table backdrops, photo booth props, floor-level statement pieces. Pro tip: Easel + hoop = instant ceremony backdrop for $15-30 rental (easel $5-10 + hoop $10-20). This is one of the highest-margin rental packages — clients love the simplicity and elegance.
Method 5: Adhesive Strips (Best for Flat-Back Hoops on Smooth Walls)
- Ensure hoop has a flat backing (many custom hoops come with MDF or acrylic back).
- Apply 2-4 large Command strips (16 lb each) to the back of the hoop — one at top, one at bottom, optional sides.
- Clean wall with rubbing alcohol. Peel strip backing, press hoop firmly to wall for 60 seconds.
- For extra security, add a small piece of fishing line from top of hoop to a Command hook above (backup if adhesive fails).
Best for: Flat-backed custom hoops, welcome signs, seating chart hoops mounted directly on walls. Caution: Only use on smooth, non-porous surfaces. Do not use on textured walls, brick, or wallpaper — adhesive won't hold and may damage surface when removed.
Height & Spacing Calculator
Wall Hoop Height Guide
| Hoop Size | Center Height from Floor | Top of Hoop | Bottom of Hoop | Notes |
|---|---|---|---|---|
| 8 inch | 60 inches (5 ft) | 64 inches | 56 inches | Tabletop or wall accent group |
| 12 inch | 60 inches (5 ft) | 66 inches | 54 inches | Eye-level for average person |
| 18 inch | 60 inches (5 ft) | 69 inches | 51 inches | Standard wall hoop height |
| 24 inch | 60 inches (5 ft) | 72 inches (6 ft) | 48 inches (4 ft) | Statement wall piece |
| 30 inch | 66 inches (5.5 ft) | 81 inches | 51 inches | Large focal point |
| 36 inch | 72 inches (6 ft) | 90 inches (7.5 ft) | 54 inches | Grand statement, needs high ceiling |
Spacing Between Hoops (Wall Groupings)
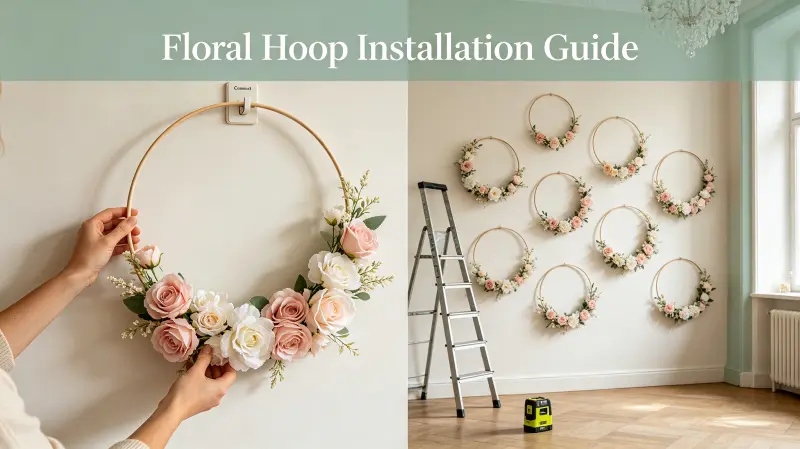
- Tight cluster (gallery wall look): 2-4 inches between hoop edges. Creates lush, full appearance. Best for backdrop walls.
- Standard spacing: 6-8 inches between hoop edges. Balanced look, each hoop visible. Most common.
- Airy/minimalist: 12-18 inches between hoop edges. Modern, spacious feel. Best for minimalist or boho aesthetics.
- Overlapping: Hoops overlap by 2-4 inches. Creates depth and layered look. Use varying sizes (large behind small).
Ceiling Installation Height
- Above dance floor: Bottom of hoops at 8-9 ft from floor (tall guests won't bump heads, but hoops still visible).
- Above dining tables: Bottom of hoops at 7-7.5 ft (low enough to be intimate, high enough for serving).
- Above ceremony aisle: Bottom of hoops at 7-8 ft (processional height).
- Photo booth backdrop: Hoops at 5-7 ft range (face-level for photos).
Pro tip: Always use a laser level to mark mounting points. A 1-degree error over 10 ft = 2 inches off-level — very noticeable in photos. Mark all positions with painter's tape before installing any hooks.
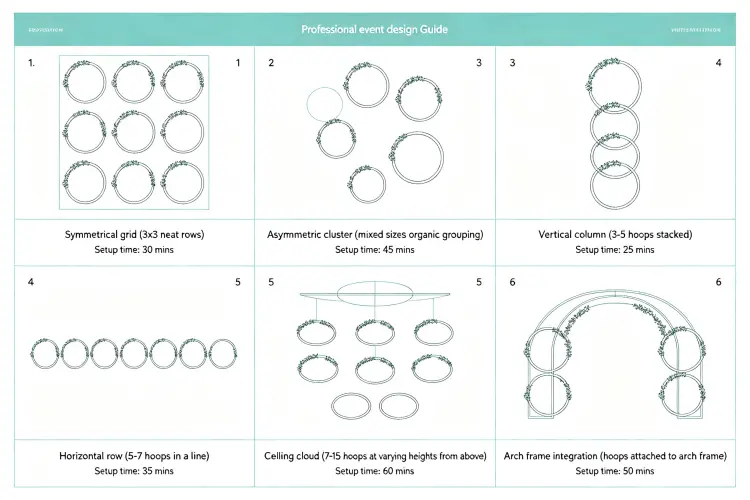
6 Popular Layout Designs
Layout 1: Symmetrical Grid (Classic)
Hoops arranged in neat rows and columns (e.g., 3x3 grid of 12-inch hoops). Perfect symmetry. Best for: modern weddings, corporate events, clean aesthetic. Setup time: 20-30 min. Requires: laser level, measuring tape, 9 hoops.
Layout 2: Asymmetric Cluster (Organic/Boho)
Hoops of varying sizes clustered organically, with larger hoops on one side and smaller trailing off. No two hoops at the same height. Best for: boho, garden, romantic weddings. Setup time: 30-45 min (more artistic judgment). Requires: 5-8 mixed-size hoops.
Layout 3: Vertical Column (Ceremony Altar)
3-5 hoops stacked vertically, slightly offset, creating a "column" effect at the ceremony altar. Largest hoop at bottom, smallest at top. Best for: ceremony backdrops, narrow spaces. Setup time: 15-20 min. Requires: 3-5 hoops (12-30 inch), easel or wall mounting.
Layout 4: Horizontal Row (Head Table Backdrop)
5-7 hoops in a horizontal row behind the head table or sweetheart table. Uniform height, even spacing. Best for: reception head tables, dessert tables. Setup time: 20-30 min. Requires: 5-7 hoops (all same size or graduated).
Layout 5: Ceiling Cloud (Dramatic)
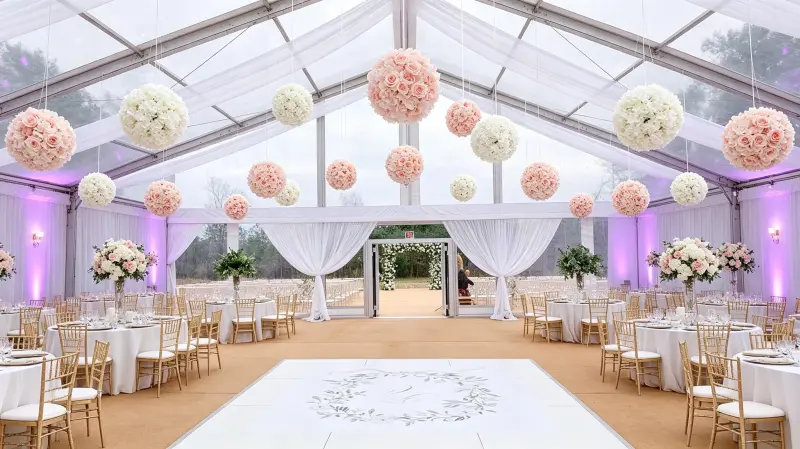
7-15 hoops suspended from ceiling at varying heights (6 inches to 2 feet difference). Creates a floating garden effect. Best for: dance floors, reception entrances, grand venues. Setup time: 45-90 min (most time-consuming). Requires: 7-15 hoops, fishing line, ladder, ceiling anchor points.
Layout 6: Arch Frame Integration (Ceremony)
Hoops attached to a metal or wooden arch frame at various points — top, sides, cascading down. Combines arch structure with hoop delicacy. Best for: outdoor ceremonies, garden weddings. Setup time: 30-45 min. Requires: arch frame + 4-8 hoops + zip ties.
Need Custom Floral Hoops for Your Rental Inventory?
Xibo Floral — 6 sizes, 20+ colors, custom designs. $8-45 wholesale, MOQ 1, 7-15 day production. Commercial-grade (50+ reuse). Free samples. 500+ rental business clients worldwide.
Request Catalog & Free SamplesSafety Rules & Weight Limits
- Always test before leaving: After hanging, pull each hoop firmly downward (2-3 times normal weight). If it holds, it's secure. If it shifts or falls, reinforce immediately.
- Never hang above guests' heads without backup: For ceiling installations over seating areas, use two independent attachment points per hoop (fishing line + backup line). If one fails, the other holds.
- Respect weight ratings: Command hooks have specific weight limits (1-7.5 lbs). Never exceed. A 36-inch hoop with dense flowers can weigh 2-3 lbs — use large/jumbo hooks.
- Check venue rules: Many venues prohibit nails, screws, or tape on certain surfaces. Always ask before installing. Some venues require a certificate of insurance for overhead installations.
- Use a sturdy ladder: Never stand on chairs, tables, or unstable surfaces. A 6-8 ft step ladder is essential. Have a spotter for ceiling installations.
- Secure loose cords: If using neon-floral hybrid hoops, tape power cords to the wall/floor to prevent tripping. Use cord covers for high-traffic areas.
- Fire safety: Keep hoops at least 3 feet from open flames (candles, fire pits). Artificial flowers are generally flame-retardant but not fireproof.
- HVAC vents: Don't hang hoops directly below air conditioning vents — airflow can cause spinning or, in extreme cases, pull hooks loose.
Outdoor & Wind-Secure Installation
Outdoor events add the variable of wind — a 15 mph gust can send a lightweight floral hoop flying. Follow these rules for secure outdoor installation:
- Use heavy-duty hanging: Command hooks fail outdoors (heat/cold reduces adhesive). Use screw-in eye hooks (wood), masonry anchors (concrete), or zip ties to sturdy structures (trees, pergolas, arches).
- Double attachment points: Every outdoor hoop gets 2 attachment points (top and side) to prevent spinning and flying.
- Lower hanging height: Hang outdoor hoops 6-12 inches lower than indoor. Lower center of gravity = less wind leverage.
- Use wind-resistant designs: Dense, full hoops catch more wind. For very windy locations, use sparse/open hoop designs (less wind resistance) or weight the bottom of the hoop with a small fishing weight hidden in flowers.
- Freestanding hoops: Always sandbag the base. Use 2 sandbags (25 lbs each) per easel. For large 36-inch freestanding hoops, use a heavy metal stand (not lightweight easel) rated for outdoor use.
- Check weather forecast: If sustained winds >20 mph predicted, move hoops indoors or cancel the installation. Better safe than damaged inventory or injured guests.
- UV consideration: Direct sunlight fades artificial flower colors over 8+ hours. For all-day outdoor events, position hoops in shade if possible, or use UV-stabilized flowers (Xibo Floral standard).
Wind speed guide: 0-10 mph = safe, any method works. 10-20 mph = use heavy-duty methods, double attachment. 20-30 mph = only use wall-mounted or very secure freestanding with sandbags. 30+ mph = take down, risk of damage/injury.
Teardown & Damage-Free Removal
- Remove hoops first: Carefully lift each hoop off its hook or cut the fishing line. Lower gently — don't let hoops fall or swing into walls/other decor.
- Remove Command hooks properly: Pull the tab straight down (not out) slowly. The adhesive stretches and releases cleanly. If a tab breaks, use dental floss behind the hook to saw through adhesive, then clean residue with rubbing alcohol.
- Remove zip ties: Cut with wire cutters, being careful not to scratch the pipe/arch. Don't pull zip ties off — they can leave marks or scratch surfaces.
- Patch holes (if any): If you used screw hooks in wood, fill holes with wood filler (carry a small tube in your kit). Most venues expect minor holes from approved installations, but filling is professional courtesy.
- Inspect venue walls: After removal, check walls for any adhesive residue, marks, or damage. Clean with rubbing alcohol if needed. Take photos of clean walls for your records (protects against false damage claims).
- Pack hoops carefully: Nest hoops of similar sizes together (they fit inside each other). Place between cardboard sheets to prevent flower crushing. Don't stack heavy items on top. Store in stackable bins.
- Inventory check: Count all hoops before leaving venue. Note any damage (loose flowers, bent frame) for repair before next rental. Update your inventory tracking spreadsheet.
Time estimate: Teardown takes 50-75% of setup time. A 30-minute setup = 15-25 minute teardown. Always build teardown time into your rental contract and pricing — many beginners forget to charge for teardown labor.
FAQ
Depends on layout and quantity: Single hoop (wall) = 5-10 minutes. Small wall grouping (5 hoops) = 15-25 minutes. Large hoop wall (10-15 hoops) = 30-60 minutes. Ceiling cloud (7-10 hoops) = 45-90 minutes (ladder work, height adjustment). Ceremony arch integration (4-8 hoops) = 30-45 minutes. Rule of thumb: 5 minutes per hoop for wall installations, 10 minutes per hoop for ceiling installations. Always add 15 minutes buffer for unexpected issues (uneven walls, hard-to-reach anchors, missing hardware). Professional rental businesses charge $50-100 for setup + $25-50 for teardown, or include it in the package price.
Textured walls (orange peel, knockdown): Command hooks have reduced adhesion — use 2x the normally required hooks (e.g., 2 large hooks instead of 1) and test one first. If it pulls off easily, use alternative method. Brick/stone: Command hooks won't work. Options: (1) Use brick clips (clamp over brick edge, $5-10 each) — works on standard brick with mortar recess. (2) Hang from ceiling with long fishing line (hoop floats in front of brick wall). (3) Use freestanding easel in front of brick wall. (4) If venue allows, use masonry screws with anchors (permanent holes — get written permission). Wallpaper: Test small hidden area first — some wallpaper delaminates with Command adhesive. When in doubt, use fishing line from ceiling or freestanding options — zero wall contact.
Single-point hanging (one hook at top) allows spinning — common issue. Solutions: (1) Use 2 attachment points — hang from 11 o'clock and 1 o'clock positions (two hooks or one hook with a V-shaped line). This prevents rotation. (2) Add a small piece of museum putty or Sticky Tack at the bottom of the hoop (6 o'clock) — adheres lightly to wall, prevents spinning without damage. (3) For ceiling-hung hoops, twist the fishing line 2-3 times before tying — the twisted line resists rotation. (4) Weight the bottom of the hoop with a small fishing weight (1/4 oz) hidden inside the flower arrangement — gravity keeps it oriented. Method 1 (2-point hanging) is the most reliable and professional.
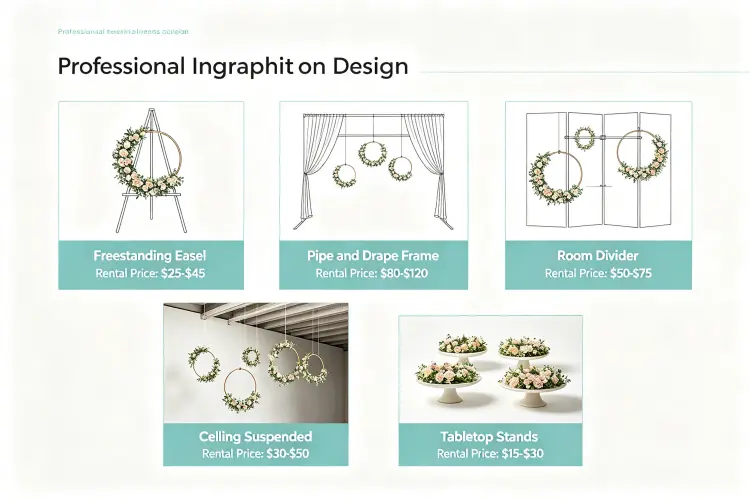
Many historic venues, churches, and luxury hotels prohibit any wall attachments. Solutions: (1) Freestanding easels — no wall contact at all. Use multiple easels with hoops for a "wall" effect. (2) Pipe-and-drape frame — build a free-standing frame (8x8 ft or 8x10 ft) and hang hoops from it. The frame sits on the floor, no wall attachment. Rental cost: $50-100 for frame + hoops. (3) Room divider / folding screen — place a decorative screen and hang hoops on it with zip ties. (4) Ceiling hanging — if ceiling attachment is allowed (many venues allow fishing line around beams/pipes), hoops can float in front of walls without touching them. (5) Tabletop hoops — place 8-12 inch hoops on stands on tables, shelves, or mantels. No wall needed. Best rental package for restrictive venues: Pipe-and-drape frame + 10 hoops = $150-250, fully freestanding, venue-approved.
Transport is the #1 cause of floral hoop damage (more than installation). Best practices: (1) Nest hoops of similar sizes inside each other — they're circular and fit perfectly. Place a sheet of tissue paper or bubble wrap between each hoop to prevent flower rubbing. (2) Use stackable plastic bins (20-gallon) — 5-8 hoops per bin depending on size. Bins protect from crushing and dust. (3) Don't stack heavy items on top of bins containing hoops. (4) For large 30-36 inch hoops that don't fit in bins, wrap in a large trash bag or furniture pad and transport flat (not leaning against car sides). (5) Avoid leaving hoops in a hot car for extended periods — extreme heat (120°F+) can soften glue and cause flowers to detach. (6) Inspect each hoop upon arrival at venue — fix any loose flowers with hot glue before hanging. With proper transport, commercial-grade hoops last 50+ rentals.
Both models work, but full-service (delivery + setup + teardown) is more profitable and professional. Comparison: DIY pickup: Client picks up hoops, installs themselves, returns after event. Price: $10-40 per hoop. Pros: no labor, no travel. Cons: higher damage rate (clients mishandle), lower revenue per order, less control over quality. Full-service: You deliver, install, and teardown. Price: $15-65 per hoop + $50-100 delivery/setup + $25-50 teardown. Pros: higher revenue (2-3x DIY), quality control, professional relationships with venues/planners, lower damage. Cons: labor time, travel. Recommended: Offer both — DIY for budget clients, full-service for premium clients. Most rental businesses find 70% of clients choose full-service once they see the price difference is only $75-150 for peace of mind. Sarah (our case study) started DIY-only, switched to full-service after 3 months, and doubled her average order value.
Source Commercial-Grade Floral Hoops for Your Rental Business
Xibo Floral floral hoops are built for 50+ rentals — reinforced frames, secure flower attachment, UV-stabilized colors. 6 sizes (8-36 inch), 20+ colors, custom designs. $8-45 wholesale, MOQ 1 piece, 7-15 day production, free samples. 500+ rental business clients worldwide. Start your inventory with $350-500 and build a $15,000+/year income stream.
Request Wholesale Catalog & Free Samples