Table of Contents
Tools You'll Need
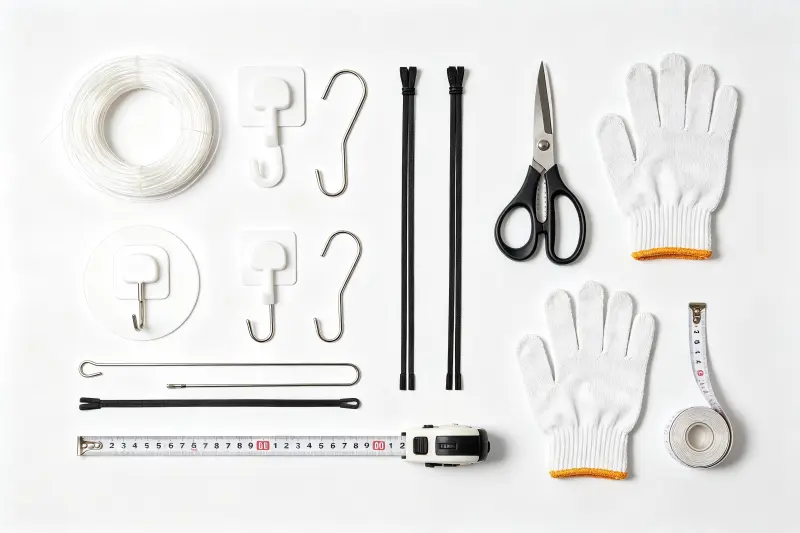
The right tools make the difference between a 30-minute install and a 2-hour headache. Here's what every installation kit should include:
Essential Tools
• Clear fishing line (20-30 lb test) — invisible from below, strong enough for garlands
• Command hooks or damage-free adhesive hooks (for smooth ceilings)
• S-hooks (for exposed beams and pipework)
• Zip ties (for securing garlands to structures)
• Ladder or step stool (tall enough to reach safely)
• Scissors or wire cutters
• Measuring tape
Optional But Recommended
• Telescoping pole (for high ceilings without a ladder)
• Safety goggles
• Gloves (to protect hands from wire stems)
• Extra garlands (10-15% spares for filling gaps)
First: Identify Your Ceiling Type
Not all ceilings are the same. The hanging method you use depends entirely on what's above you.
Drywall / Smooth Ceilings
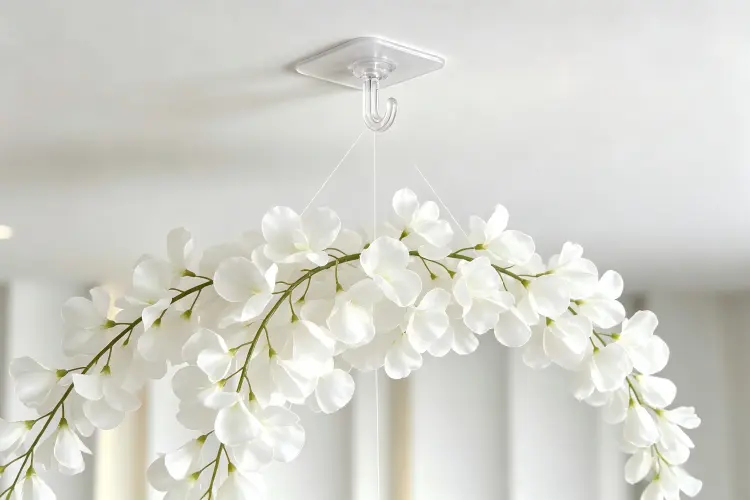
Most common in hotels and banquet halls. Use adhesive hooks — they hold strong and peel off cleanly without paint damage.
Weight limit: 3-5 lbs per hook (check packaging)
Exposed Beams / Ductwork
Industrial venues, barns, and lofts. S-hooks or zip ties directly onto the structure. Fastest and most secure method.
Weight limit: Essentially unlimited (limited only by the beam itself)
Drop Ceiling Tiles
Office buildings and conference centers. Use special drop-ceiling hooks that clip onto the metal grid framework. Never hang from the tiles themselves — they'll break.
Weight limit: 2-3 lbs per grid hook
Outdoor Patios / Tents
Tent poles, rafters, or string light wires. Zip ties or carabiners work best. Always test tension before loading full weight.
Weight limit: Depends on tent structure
6-Step Installation Guide
Plan Your Layout First
Before you climb a ladder, map out exactly where everything goes.
- Mark anchor points on the floor with tape
- Calculate how many strands you need per section
- Decide on height variation — mixed heights always look better
Pro tip: Take a photo of the empty ceiling and draw your layout on it for reference.
Install All Anchor Points
Put up every hook or attachment point before hanging any garlands. This is faster and safer than going up and down the ladder for each strand.
- Space hooks 2-3 feet apart for wisteria garlands
- For heavy installations, add extra anchors at load points
- Double-check every hook is firmly attached before adding weight
Prep Your Garlands on the Ground
Untangle and fluff garlands on the floor before lifting them up. Garlands straight out of the box are compressed and flat — 2 minutes of fluffing makes a huge difference.
- Gently separate flower clusters
- Bend stems to create natural curves
- Group strands by length for easy installation
Hang Garlands Section by Section
Start from one end and work across. Don't try to hang everything at once.
- Tie fishing line to the top of each garland strand
- Hook onto ceiling anchors
- Adjust height as you go
- Work with a partner — one on ladder, one guiding from below
Fill Gaps & Adjust
Once everything is hung, step back and look from multiple angles.
- Fill any sparse areas with extra garland pieces
- Adjust heights for balanced look
- Make sure no fishing line is visible from guest eye level
- Walk the full perimeter to check for gaps
Final Safety Check
Before you leave the venue:
- Tug test every anchor point (gently pull down — nothing should move)
- Check that nothing is hanging low enough for guests to hit
- Verify all loose ends are trimmed and secured
- Take photos for your portfolio
5 Damage-Free Hanging Techniques
1. Command Hooks for Smooth Ceilings
The gold standard for damage-free hanging on drywall and painted surfaces.
- Clean the ceiling area with rubbing alcohol first
- Press firmly for 30 seconds
- Wait 1 hour before hanging weight (critical for maximum hold)
- To remove: pull straight down slowly (not out) — stretches adhesive and releases cleanly
2. Fishing Line Invisible Support
Clear fishing line is invisible from 5+ feet away. Nobody will see it, but it holds everything up.
- Use 20-30 lb test for standard garlands
- Double up the line for heavy pieces
- Tie with a secure bowline knot (easy to untie later)
3. Beam Wrapping for Industrial Venues
For exposed beams, wrap zip ties or fabric straps directly around the beam.
- No adhesive needed = zero damage
- Distribute weight across multiple points
- Cover straps with greenery for a polished look
4. Drop Ceiling Grid Clips
Specialized clips that hook onto the metal T-bar grid of drop ceilings.
- Never hang from ceiling tiles themselves
- Each clip holds 2-3 lbs
- Available at hardware stores or online
5. Existing Structure Utilization
Look for things already hanging from the ceiling — string lights, sprinkler pipes, HVAC ducts.
- Always ask venue permission first
- Use soft zip ties, not metal wire (to avoid scratching)
- Distribute weight, don't overload one point
Safety Rules You Can't Skip
Ceiling installations are safe when done right, but dangerous when rushed.
Never Do These Things
• Never stand on the top rung of a ladder
• Never hang from sprinkler heads or fire safety equipment
• Never exceed weight limits on hooks or anchors
• Never install alone — always have a spotter
• Never use nails, screws, or staples in rental venues
Weight Guidelines
- Standard wisteria garland (6ft): ~0.5-1 lb per strand
- Mixed installation (50 strands): ~30-50 lbs total
- Always distribute weight across multiple anchor points, never concentrate it in one spot
Venue Communication
- Always ask about hanging policies before you arrive
- Show photos of your method (adhesive hooks = no damage)
- Get permission in writing if possible
- Some venues require a certificate of insurance for ceiling installs
Takedown & Storage Tips
Good takedown habits make your garlands last longer and your next install faster.
Takedown Steps
- Remove garlands one section at a time
- Untie knots carefully — don't yank (damages flower clusters)
- Remove hooks properly (follow manufacturer directions)
- Inspect each garland for damage as you take it down
- Coil loosely for transport — tight tangles = broken flowers
Storage Best Practices
- Hang garlands on large hooks or garment racks if you have space
- If coiling, use large loose coils in wide bins
- Never cram them into small containers
- Store in cool, dry area away from direct sun
- Label bins by color and length
FAQs About Hanging Flower Garlands
For a standard 20×20ft dance floor canopy with 50 strands, plan on 2 people × 30-45 minutes. First-time installers should budget 60 minutes. The more you do it, the faster you get.
When applied and removed correctly (clean surface, press firmly, pull straight down slowly), Command hooks don't damage paint. Always test on an inconspicuous spot first, and never use on wallpaper or delicate surfaces.
Standard adhesive ceiling hooks hold 3-5 lbs each. For heavier installations, use more hooks spaced closer together. The key is distributing weight across many points, not relying on one hook to hold everything.
Yes, but only from the metal grid framework — never from the tiles themselves. Use special drop-ceiling T-bar clips that hook onto the grid. Each clip typically holds 2-3 lbs.
10 feet minimum. Your garlands should hang no lower than 8 feet from the floor (to avoid people hitting their heads). Best results at 12-20 foot ceilings where you have room for dramatic long strands.
Ready to Offer Ceiling Garland Installations?
Start with commercial-grade wisteria garlands designed for repeated setup and takedown. Durable stems, secure flower attachments, and consistent color — built for rental business use.
Get Wholesale Samples & Pricing