Introduction
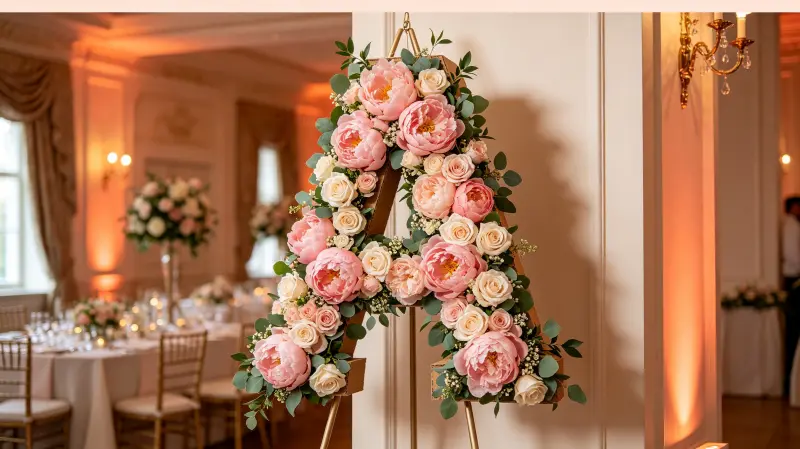
A custom flower letter sign is one of the most impactful decor pieces you can make — and it's surprisingly beginner-friendly. With a wood backing, artificial flowers, and a hot glue gun, you can create a stunning 2ft letter sign in 2-3 hours for $20-40 in materials. This tutorial covers everything from design to hanging, with 3 flower attachment methods, pro tips for durability, and a cost comparison. Whether you're making one for your own wedding, starting a side hustle, or building rental inventory, these techniques produce professional-quality results.
Pre-Made Flower Signs from $15-120 Wholesale
Don't have time to DIY? Xibo Floral manufactures ready-to-use custom flower signs. MOQ 1 piece, free design mockup, 7-15 day production. Free samples available.
Request Custom QuoteMaterials & Tools List
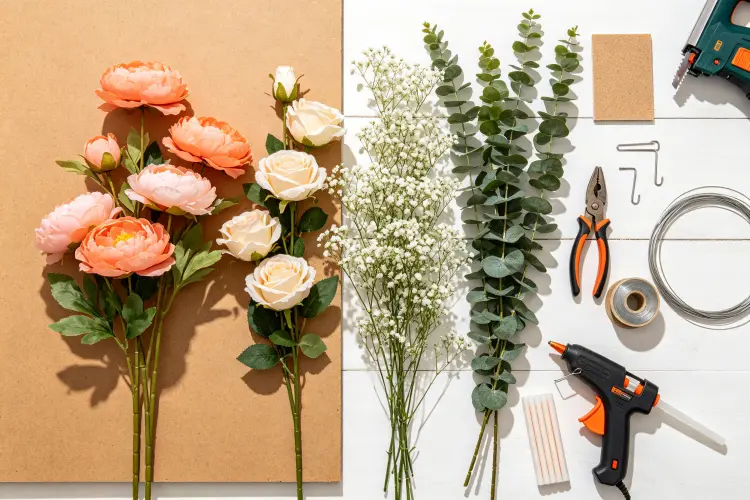
| Item | Quantity (for 1 x 2ft letter) | Est. Cost | Notes |
|---|---|---|---|
| MDF board (1/4 inch, 2x2ft) | 1 | $5-10 | Backing material. 9mm for commercial/rental |
| Artificial flowers (peonies/roses) | 25-40 stems | $10-25 | Main focal flowers. Buy wholesale for best price |
| Filler flowers (babys breath/wax) | 2-3 bunches | $3-8 | Fills gaps between focal flowers |
| Greenery (eucalyptus/ivy) | 1-2 stems | $2-5 | Adds texture and hides edges |
| Hot glue gun + glue sticks | 1 set | $8-15 | High-temp gun recommended. 10-15 sticks |
| Floral wire (22 gauge) | 1 roll | $3-5 | For reinforced attachment (rental use) |
| Wire cutters | 1 | $5-8 | Cut flower stems and wire |
| Jigsaw or scroll saw | 1 | $0 (borrow) or $40-80 | Cut MDF to letter shape |
| Sandpaper (120 grit) | 1 sheet | $1-2 | Smooth cut edges |
| Picture hanging hooks (2) | 2 | $2-4 | Screw into back for hanging |
| Total (DIY, one-time use) | — | $39-92 | — |
Step 1: Design & Cut the Letter Backing
- Choose your font: Bold, blocky fonts work best (Arial Black, Impact, Bebas Neue). Avoid thin script fonts for beginners — narrow sections are hard to flower and fragile. Print the letter at your desired size (1ft, 2ft, or 3ft tall).
- Print and cut the template: Print the letter on multiple sheets of paper (tile print) and tape together. Cut out the letter shape with scissors.
- Trace onto MDF: Place the paper template on the MDF board. Trace around it with a pencil. For symmetrical letters, fold the template in half for perfect symmetry.
- Cut with jigsaw: Clamp the MDF to a worktable. Cut along the pencil line with a jigsaw (use a fine-tooth blade for clean cuts). For inside cuts (like the center of an "A" or "O"), drill a starter hole first, then insert the jigsaw blade.
- Sand edges: Sand all cut edges with 120-grit sandpaper until smooth. Remove any splinters or rough spots. Wipe off dust with a damp cloth.
- Optional: Paint the backing: If you're doing partial flower coverage (not 100%), paint the visible backing areas with acrylic paint that matches your flower color palette. For full coverage, no paint needed.
Alternative (no power tools): Order a pre-cut MDF letter from Etsy or a local craft store ($10-20). This saves 30-60 minutes and avoids the need for a jigsaw. Many craft stores (Michaels, Hobby Lobby) sell pre-cut wood letters in 1-2ft sizes.
Step 2: Prepare Flowers
- Sort flowers by size: Separate into large (peonies, dahlias — 4-5 inch diameter), medium (roses, ranunculus — 2-3 inch), and small (babys breath, wax flower — 1-2 inch). This helps with placement planning.
- Cut stems short: Use wire cutters to cut all flower stems to 1-2 inches. Short stems lay flatter against the backing and are easier to glue. For large flowers, leave 2 inches; for small, 1 inch is enough.
- Remove leaves: Pull off most leaves from the stems (they get in the way of gluing). Save a few eucalyptus or ivy leaves for accent placement.
- Fluff flowers: Gently separate and shape each flower's petals. Artificial flowers often arrive compressed — fluffing makes them look full and natural.
- Plan color placement: If using multiple colors, lay out flowers on the letter (without gluing) to test the design. Take a photo for reference. Common patterns: gradient (dark to light), clustered (color blocks), or random mix.
Step 3: Attach Flowers (3 Methods)
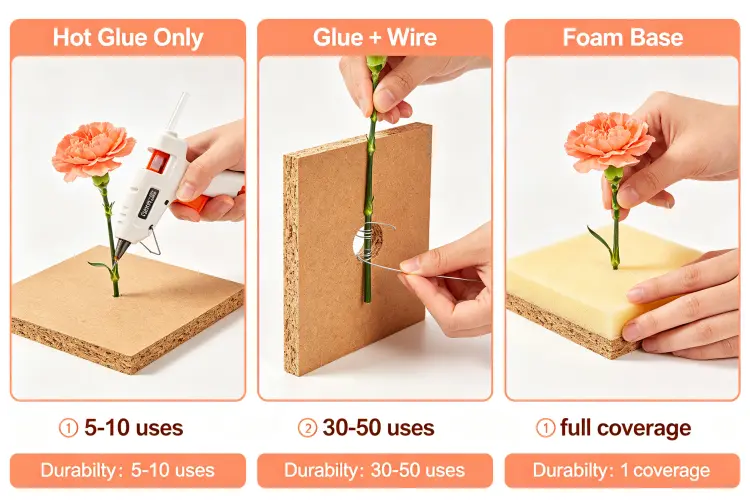
Method A: Hot Glue Only (Fastest, for one-time use)
- Heat the glue gun to high temperature.
- Apply a generous dot of glue to the base of the flower stem (the plastic part where petals attach).
- Press firmly onto the MDF backing. Hold for 5-10 seconds until glue sets.
- Work from the center outward, or from top to bottom. Start with large focal flowers, then fill with medium, then small.
- Overlap flowers slightly (1/4 inch) to hide gaps and create fullness.
- Best for: One-time events, DIY brides, craft projects. Not recommended for rental use (flowers may fall off after 3-5 uses).
Method B: Glue + Wire (Most Durable, for rental use)
- Drill a small hole (1/8 inch) through the MDF at each flower attachment point.
- Thread floral wire through the hole, leaving 2 inches on the front side.
- Wrap the wire around the flower stem tightly, twist 2-3 times.
- Add a dot of hot glue on the stem base for extra security.
- Press flower onto backing, with wire providing mechanical hold.
- On the back side, twist the remaining wire ends and bend flat against the backing. Cover with tape if desired.
- Best for: Rental businesses, commercial use, frequent handling. Flowers won't fall off even after 50+ uses.
Method C: Foam Base (Best for 3D/full coverage)
- Glue a 1-inch thick floral foam sheet to the MDF backing (cut to match the letter shape).
- Insert flower stems directly into the foam — no glue needed for most flowers.
- Foam holds stems securely and allows easy repositioning during design.
- For extra security, add a dot of glue at the insertion point for large/heavy flowers.
- Best for: Full-coverage designs, 3D effects, designs you might want to rearrange. Adds 1 inch of depth to the sign.
Step 4: Fill Gaps & Add Greenery
- Inspect for bare spots: Hold the sign at eye level and look for any visible MDF backing. Mark gaps with a small piece of tape.
- Add filler flowers: Use small flowers (babys breath, wax flower, astilbe) to fill gaps. These are flexible and can be tucked into tight spaces between larger flowers.
- Add greenery accents: Tuck eucalyptus leaves, ivy sprigs, or fern fronds at the edges and in gaps. Greenery breaks up the "all flower" look and adds natural texture. Place 3-5 greenery accents per letter — don't overdo it.
- Cover edges: Pay special attention to the outer edges of the letter. Flowers should extend slightly over the edge (1/4 inch) to hide the MDF side. If edges are visible, glue small flowers or greenery along the perimeter.
- Step back and assess: Place the sign on a wall or easel and view from 6-8 feet away. This distance reveals gaps that aren't visible up close. Fill any remaining bare spots.
Step 5: Add Hanging Hardware
- Determine hanging points: For a 2ft letter, use 2 hanging hooks placed 1/3 from the top on each side. This distributes weight evenly and prevents tilting.
- Screw in D-rings or picture hooks: On the back of the MDF, screw in 2 D-ring picture hangers (rated for 10+ lbs each). Pre-drill small holes to prevent MDF from splitting.
- Add hanging wire (optional): Thread picture hanging wire between the two D-rings. This allows the sign to hang from a single nail or hook. Twist wire ends securely.
- For freestanding use: If the sign will sit on a table or easel, no hanging hardware needed. Add felt pads to the bottom edge to prevent scratching surfaces.
- For arch/topper use: Add 2-3 cable ties or zip ties on the back. These allow you to secure the sign to a flower arch or moon gate frame.
- Weight test: Once hardware is installed, lift the sign by the hanging wire/hooks. Confirm it's secure and balanced. The sign should hang level (not tilt to one side).
Save Time — Buy Wholesale from $15-120
Xibo Floral custom flower signs arrive fully decorated, ready to hang. MOQ 1 piece, free design mockup, 7-15 day production. Commercial-grade quality, 50+ reuse lifespan. Free samples available.
Get Wholesale CatalogPro Tips for Professional Results
- Work in a well-ventilated area: Hot glue fumes and MDF dust are irritating. Open windows or use a fan.
- Use a high-temp glue gun: Low-temp glue doesn't bond well to plastic flower stems. High-temp (380°F+) creates a strong bond.
- Don't skimp on glue: Each flower needs a generous dot (pea-sized minimum). Skimping leads to flowers falling off later.
- Vary flower heights: Don't lay all flowers flat. Angle some outward (15-30 degrees) for a 3D, lush look. This is the difference between "craft project" and "professional."
- Use odd numbers: Cluster flowers in groups of 3, 5, or 7. Odd numbers look more natural than even pairs.
- Keep the color palette tight: 2-3 main colors + greenery = elegant. 5+ colors = chaotic. When in doubt, go monochromatic (all white, all blush, all pink).
- Photograph your work: Take photos from multiple angles. This helps you spot gaps and serves as portfolio material if you're selling or renting.
- For rental durability: Always use Method B (glue + wire). Method A (glue only) flowers will start falling off after 3-5 rentals. The extra 30 minutes of wiring is worth it.
Cost: DIY vs. Buy Ready-Made vs. Retail
| Option | Cost (2ft letter) | Time | Reusable? | Best For |
|---|---|---|---|---|
| DIY (this tutorial, glue only) | $20-40 | 2-3 hours | 5-10 uses | One-time events, crafty brides |
| DIY (glue + wire, rental-grade) | $25-50 | 3-4 hours | 30-50 uses | Rental businesses, side hustle |
| Buy wholesale (Xibo Floral) | $25-50 | 0 (ready to hang) | 50+ uses | Busy planners, consistent quality, bulk orders |
| Retail (Etsy/Amazon) | $80-200 | 0 | 10-20 uses | One-time use, small quantity |
| Fresh flower florist | $150-350 | Florist handles | No (1 day) | Luxury weddings, no budget constraints |
Key insight: Buying wholesale from Xibo Floral ($25-50) costs about the same as DIY ($20-50) but saves 2-4 hours of labor and ensures consistent commercial-grade quality. DIY only makes sense if you enjoy crafting, need a custom design not available pre-made, or are making just one sign for personal use. For rental businesses or planners making multiple signs, wholesale is more cost-effective when you factor in labor time.
FAQ
Depends on flower size and desired density: Full coverage (no backing visible): 30-50 flowers (mix of large/medium/small). Standard coverage (80%): 25-35 flowers. Sparse/airy (50-60%): 15-25 flowers. As a rough guide: 1 large flower (4-5 inch) covers ~16 sq inches. A 2ft tall letter "A" has ~200 sq inches of surface area. So you need ~12-15 large flowers equivalent, but mixing sizes means you'll use 25-40 total stems. Buy 20% extra to account for mistakes and gaps. Xibo Floral sells flower packs specifically sized for 1ft, 2ft, and 3ft letters.
With proper care: Glue-only construction = 5-10 uses (1-2 years). Glue + wire construction = 30-50 uses (3-5 years). Factors that shorten lifespan: frequent handling/transport, direct sunlight (fades colors), moisture (warps MDF), poor storage (crushing flowers). To maximize lifespan: store flat in a dry area, dust with a feather duster after each use, avoid direct sunlight, transport in a rigid box or between cardboard sheets. Commercial-grade signs from Xibo Floral use reinforced construction and UV-stabilized flowers, lasting 50+ rentals.
Yes! Multi-letter signs are made the same way — just cut out each letter separately and flower them individually. For a connected word (like "LOVE" or "BABY"), you have two options: (1) Separate letters hung together — easier to make and transport, allows spacing adjustment. (2) Connected letters on one backing — more stable but harder to transport and store. Most rental businesses prefer separate letters for versatility. For a 4-letter word at 1ft each: budget $80-160 in materials (wholesale flowers) or $60-100 from Xibo Floral. Plan for 6-10 hours of DIY time for a 4-letter word.
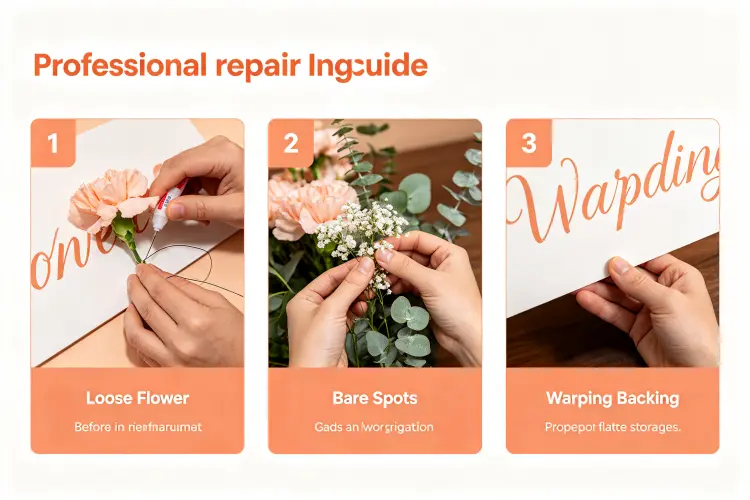
Common issue with glue-only construction. Fix: (1) Remove the loose flower and clean old glue from the stem and backing with a craft knife. (2) Apply fresh hot glue (high-temp) to the stem base. (3) Press firmly for 10 seconds. (4) For rental signs, add a wire wrap as reinforcement (drill small hole, thread wire, wrap around stem). Prevention: Use high-temp glue (not low-temp), apply generous glue amount, and consider the glue + wire method for any sign that will be handled or transported frequently. Keep a small repair kit (glue gun, extra flowers, wire) with your rental inventory for on-site fixes.
Absolutely — this is a popular side hustle. Pricing: Rent individual 2ft letters for $25-50 each per event. Rent a full name/word (4-6 letters) for $100-250. Sell custom signs on Etsy for $80-200 each (200-400% markup on materials). To start: Make 3-5 sample signs in popular colors (blush, white, eucalyptus green). Photograph them professionally (natural light, styled backdrop). Create an Instagram account and list on Facebook Marketplace, local wedding groups, and Etsy. Most rental businesses see 5-15 bookings in their first year. At $150 average booking, that's $750-2,250 revenue from a $150-250 initial inventory investment.
No problem — several alternatives: (1) Buy pre-cut wood letters from Michaels, Hobby Lobby, or Etsy ($10-25 each). They come in various fonts and sizes, ready to flower. (2) Use thick cardboard or foam board instead of MDF — cut with a utility knife (X-Acto). Lighter but less durable (best for one-time use). (3) Use a Cricut or Silhouette cutting machine for thin materials (cardstock, foam). (4) Ask a local maker space or friend to cut the MDF for you (often $5-10 per letter). (5) Buy a pre-made flower sign wholesale from Xibo Floral — no tools needed at all. For beginners, pre-cut letters are the best way to skip the hardest part and focus on the fun flower arrangement.
Ready to Make or Buy Your Flower Sign?
Whether you DIY or buy ready-made, Xibo Floral has you covered. Wholesale artificial flowers from $0.50-3/stem, pre-made custom flower signs from $15-120. MOQ 1 piece, free design mockup, 7-15 day production, free samples available. 4000sqm factory, 500+ rental business clients worldwide.
Request Wholesale Catalog & Free Samples